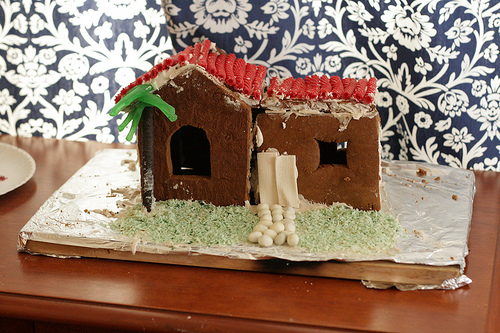
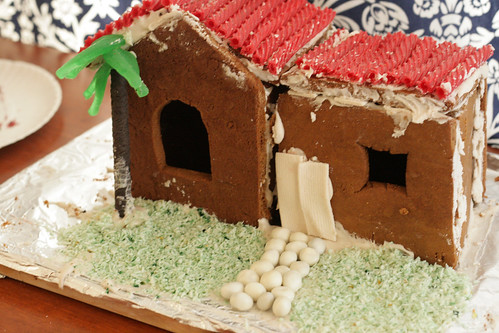
It’s Daring Bakers time again, and this time they made me build a freaking gingerbread house. Although this seems like a lighthearted fun activity that’s perfect to share with the kiddos, be warned: This is not for the faint of heart. Or the inexact. Or the short on time. Or the parents of toddlers who want to help. Or anyone who wants to keep their kitchen even remotely neat.
The December 2009 Daring Bakers’ challenge was brought to you by Anna of Very Small Anna and Y of Lemonpi. They chose to challenge Daring Bakers’ everywhere to bake and assemble a gingerbread house from scratch. They chose recipes from Good Housekeeping and from The Great Scandinavian Baking Book as the challenge recipes.
And someday I might even forgive them. When I stop finding bits of royal icing in unlikely places. If that ever happens.
So yeah, I built it. It was supposed to look like one of the Spanish bungalows that my neighborhood in LA is rife with, which was my husband’s idea. Or at least something he was very enthusiastic about. In the planning stages. Did he help with execution? I’ll let you guess.
Here is an example of a real Spanish bungalow(I totally borrowed this from the MLS):

If you squint REAL hard, you can sort of kind of see what I was getting at. And yes, those giant gaps are intentional. They’re earthquake damage, OK?
Let’s just say this: I like to cook, and I like to bake. I even like to make food look pretty. But the building of a gingerbread house has very little to do with cooking, and a whole lot to do with construction. And let’s just say there’s a reason this isn’t a craft blog, OK?
I picked Anna’s recipe because it seemed straightforward enough. For the icing, I mixed together some egg whites I had defrosted, a tetch of white balsamic vinegar and enough powdered sugar to make it truly cement like. I will say this — the gingerbread held its shape reasonably well, was sturdy enough to assemble and even tasted pretty good. So if you are crazy enough to go build your own gingerbread house, this seems like a perfectly serviceable recipe.

- 2½ cups (500g) packed dark brown sugar
- 1½ cups (360mL) heavy cream or whipping cream
- 1¼ cups (425g) molasses
- 9½ cups (1663g) all-purpose flour
- 2 tablespoon(s) baking soda
- 1 tablespoon(s) ground ginger
- Directions
- In very large bowl, with wire whisk (or with an electric mixer), beat brown sugar, cream, and molasses until sugar lumps dissolve and mixture is smooth. In medium bowl, combine flour, baking soda, and ginger. With spoon, stir flour mixture into cream mixture in 3 additions until dough is too stiff to stir, then knead with hands until flour is incorporated and dough is smooth.
- Divide dough into 4 equal portions; flatten each into a disk to speed chilling. Wrap each disk well with plastic wrap and refrigerate at least 4 hours or overnight, until dough is firm enough to roll.
- Grease and flour large cookie sheets (17-inch by 14-inch/43x36cm)
- Roll out dough, 1 disk at a time on each cookie sheet to about 3/16-inch thickness. (Placing 3/16-inch dowels or rulers on either side of dough to use as a guide will help roll dough to uniform thickness.)
- Trim excess dough from cookie sheet; wrap and reserve in refrigerator. Chill rolled dough on cookie sheet in refrigerator or freezer at least 10 minutes or until firm enough to cut easily.
- Preheat oven to 300 degrees F (149C)
- Use chilled rolled dough, floured poster board patterns (I cut my patterns on parchment, which was easy and worked fine), and sharp paring knife to cut all house pieces on cookie sheet, making sure to leave at least 1¼ inches between pieces because dough will expand slightly during baking. Wrap and reserve trimmings in refrigerator. Combine and use trimmings as necessary to complete house and other decorative pieces. Cut and bake large pieces and small pieces separately.
- Chill for 10 minutes before baking if the dough seems really soft after you cut it. This will discourage too much spreading/warping of the shapes you cut.
- Bake 25 to 30 minutes, until pieces are firm to the touch. Do not overbake; pieces will be too crisp to trim to proper size.
- Remove cookie sheet from oven. While house pieces are still warm, place poster-board patterns on top and use them as guides to trim shapes to match if necessary. Cool pieces completely before attempting to assemble the house.
- This makes enough dough for two gingerbread houses. Happy insanity.


LOL. A tropical ginger bungalow. You just gotta love that palm tree in front of the house.
http://mangerie.blogspot.com/2009/12/het-kerstdessert-met-hoofdletters.html
I think your bungalow is totally cute–I love the gummy palm tree! 🙂
Hahaha.. oh dear, is it too late to apologise? 😀 I love your bungalow! It’s the first gingerbread bungalow I’ve seen so far, so it has the added honour of being incredibly unique. (Are we forgiven yet?? hehe).
How very very funny…. I have been surfing around looking at some of the various creations as I recently joined Daring Baker and am waiting for my approval…. I am thinking I should rescind it before I am required to attempt something like this. The earthquake damage is adorable. I think you did a fine job!
I’m sorry things didn’t go as planned, but I think your house is adorable! I hope you enjoy the next challenge =D.
i LOVE your palm tree! Adorable house 🙂
You know, you’re not far off that Spanish bungalow pic at all! I can totally see what you were going for and I think it’s really pretty. So there!! 😛
I’m cracking up with all your ‘caveats’. Bravo for sticking it out despite the pain-in-the-arse nature of the challenge. I like the palm tree =)
you’re funny! your house looks great. i especially like your palm tree. and i think that my house was in the same earthquake as yours. i just didn’t show those bits in my pictures. 🙂
I think you did a way better job than you think. Mine will probably be a crumbling house whenever I finally get to it!
This is absolutely hilarious! Personally, I think your house looks EXACTLY like the MLS house. I’d live in it anyday!