It’s time for the Daring Bakers again, and while this month’s challenge presented its own obstacles, It had the advantage over last month’s challenge for me by 1) Taking only a reasonable amount of time, 2) Not leaving my entire house covered in royal icing and 3) resulting in something that I would actually like to eat. Wait, maybe that last one isn’t such a good thing. My thighs aren’t thanking me for these suckers. (Fortunately, my husband’s colleagues are — thank goodness for willing recipients of sugary treats).
The January 2010 Daring Bakers’ challenge was hosted by Lauren of Celiac Teen. Lauren chose Gluten-Free Graham Wafers and Nanaimo Bars as the challenge for the month. The sources she based her recipe on are 101 Cookbooks and www.nanaimo.ca.
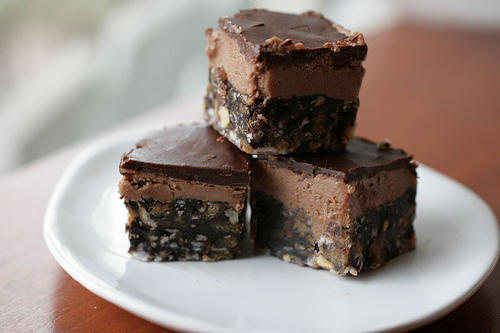
If you’ve never heard of Nanaimo bars, they’re as fun to eat as they are to say (they’re pronounced nuh NIE mo). A local specialty invented in Nanaimo, British Columbia (Lauren chose them in honor of the Winter Olympics in Vancouver), they are relatively easy to assemble (if you don’t make your own graham crackers). The bottom is a rich crumb crust flavored with cocoa, coconut and nuts, topped with a sweet icing layer and finally a chocolate ganache. To spice things up, and because I had some hazelnuts I wanted to use, I elected to make chocolate hazelnut nanaimo bars, using toasted hazelnuts in the bottom layer and making a nutella flavored icing for the middle layer. They were incredibly rich, incredibly sweet, and a little addictive.
Because Lauren is cool and I wanted to honor the spirit of the challenge, I did elect to make the graham crackers gluten free. However, because I made some substitutions to Lauren’s recipe and I don’t trust myself much when it comes to gf baking, and because Lauren did give us the option, I also made some of the graham crackers with wheat flour.
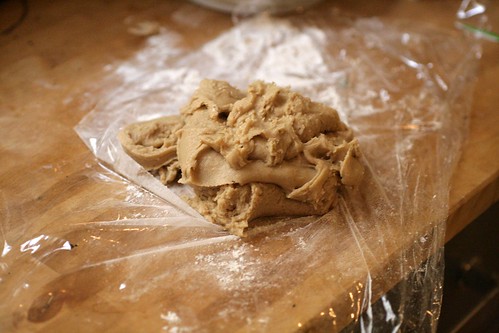
Lauren recommended using a blend of Tapioca, Sorghum and sweet rice flours to replace the wheat flour in the recipes. I had trouble finding all of these and lacked both the time and the funds to invest in hunting down and purchasing several different gluten free flours, so I used Bob’s Red Mill Gluten Free Baking mix in my gluten free graham crackers. And it was sticky. Really sticky. God bless the gluten free bakers for their heroic work, because I couldn’t work with the dough at all. (It doesn’t help that I already have a pathological aversion to rolling things out, I suppose).
Here’s the GF dough right out of the food processor:

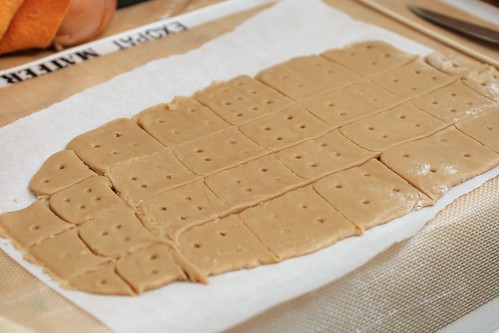
And here’s the wheat dough, which was also sticky, but more manageable, as you can probably see from the photo:

After I had chilled both doughs, I rolled them out. Or I should say “attempted to roll them out.” Even after sandwiching the chilled gf dough between two pieces of parchment paper, it was more like batter than dough, and when I peeled off the top piece of parchment, at least half the dough came with it. Undeterred, I just threw the whole bottom half in the oven, parchment and all, and baked it for about 20 minutes.
The wheat dough I was actually able to cut into squares (although I then didn’t separate the squares and all my hard work disappeared upon baking. These were fairly easy to cut warm into neat squares.)

The finished crackers were both delicious, and while the wheat ones were prettier, the gluten free ones had an interesting and pleasant flavor that I just couldn’t quite put my finger on. I ended up using the wheat ones in the nanaimo bars (there were more of them, due to less rolling loss) but both crackers disappeared pretty quickly in my household (as in, within two hours). Neither cracker was as crisp as commercial graham crackers.

After the graham crackers, the Nanaimo bars were a snap to put together. I blitzed some of the graham crackers in the food processor to make crumbs, and used chopped toasted hazelnuts, Callebaut dutch cocoa, and unsweetened coconut flakes (there was plenty of sweetness in these, so I tried to cut it wherever possible. I also used Scharffenberger bittersweet chocolate for the top layer.)
Because I love Nutella, I opted to make a nutella icing for the middle layer. This is easy, but incredibly sweet, with the rich flavor of Nutella. I try to buy imported Nutella whenever possible because most Nutella distributed outside the US is not made with hydrogenated oil, so we can pretend it’s health food. I think it also tastes better — much closer to the Nutella I first tasted in Italy, where it is ubiquitous. Luckily, my local market carries imported Nutella — I’ve bought Polish nutella there before, but this jar happened to be Canadian, which was nice, given the nature of the challenge.
I found it was easiest to cut them if I didn’t chill the bottom layer too long before adding the frosting. I added the top layer as soon as the frosting was set. I also let them sit at room temperature for a few minutes before cutting them.
I’ve wanted to make Nanaimo bars for a long time. I first encountered Nanaimo Bars in the brilliant Christopher Guest movie “A Mighty Wind”, in which former 60’s folk singer Mickey (played by Catherine O’Hara) discovers that her singing partner, Mitch has disappeared right before a reunion concert. The concert organizer asks if she would consider performing both parts in their duets, and she says “No, I’d consider going home, making a nice tray of nanaimo bars, lying in bed and watching TV – that’s what I like doing.”
Well, having now made nanaimo bars, I can say that yes, that’s what I like doing too.

- 1 cup (138 g) (4.9 ounces) Sweet rice flour (also known as glutinous rice flour)
- ¾ cup (100 g) (3.5 ounces) Tapioca Starch/Flour
- ½ cup (65 g) (2.3 ounces) Sorghum Flour
- (I used 2¼ c. Bob's Red Mill Gluten Free Baking Mix for the Gluten Free wafers, and 2¼ c. all purpose flour for the wheat ones.)
- 1 cup (200 g) (7.1 ounces) Dark Brown Sugar, Lightly packed
- 1 teaspoon (5 mL) Baking soda
- ¾ teaspoon (4 mL ) Kosher Salt
- 7 tablespoons (100 g) (3 ½ ounces) Unsalted Butter (Cut into 1-inch cubes and frozen)(I used salted butter and chilled but did not freeze it, which may have contributed to the chewiness of the final product)
- ⅓ cup (80 mL) Honey, Mild-flavoured such as clover.
- 5 tablespoons (75 mL) Whole Milk
- 2 tablespoons (30 mL) Pure Vanilla Extract
- In the bowl of a food processor fitted with a steel blade, combine the flours, brown sugar, baking soda, and salt. Pulse on low to incorporate. Add the butter and pulse on and off, until the mixture is the consistency of a coarse meal. If making by hand, combine aforementioned dry ingredients with a whisk, then cut in butter until you have a coarse meal. No chunks of butter should be visible.
- In a small bowl or liquid measuring cup, whisk together the honey, milk and vanilla. Add to the flour mixture until the dough barely comes together. It will be very soft and sticky.
- Turn the dough onto a surface well-floured with sweet rice flour and pat the dough into a rectangle about 1 inch thick. Wrap in plastic and chill until firm, about 2 hours, or overnight.
- Divide the dough in half and return one half to the refrigerator. Sift an even layer of sweet rice flour onto the work surface and roll the dough into a long rectangle, about ⅛ inch thick. The dough will be quite sticky, so flour as necessary. Cut into 4 by 4 inch squares. Gather the scraps together and set aside. Place wafers on one or two parchment-lined baking sheets. Chill until firm, about 30 to 45 minutes. Repeat with the second batch of dough.
- Adjust the rack to the upper and lower positions and preheat oven to 350 degrees Fahrenheit (180 degrees Celsius).
- Gather the scraps together into a ball, chill until firm, and reroll. Dust the surface with more sweet rice flour and roll out the dough to get a couple more wafers.
- Prick the wafers with toothpick or fork, not all the way through, in two or more rows.
- Bake for 25 minutes, until browned and slightly firm to the touch, rotating sheets halfway through to ensure even baking. Might take less, and the starting location of each sheet may determine its required time. The ones that started on the bottom browned faster.
- When cooled completely, place enough wafers in food processor to make 1 ¼ cups (300 mL) of crumbs. Another way to do this is to place in a large ziplock bag, force all air out and smash with a rolling pin until wafers are crumbs.

- ½ cup (115 g) (4 ounces) Unsalted Butter (I used salted butter)
- ¼ cup (50 g) (1.8 ounces) Granulated Sugar
- 5 tablespoons (75 mL) Unsweetened Cocoa
- 1 Large Egg, Beaten
- 1¼ cups (300 mL) (160 g) (5.6 ounces) Gluten Free Graham Wafer Crumbs (See previous recipe) (I used the wheat graham wafer crumbs)
- ½ cup (55 g) (1.9 ounces) Almonds (Any type, Finely chopped) (I used toasted hazelnuts)
- 1 cup (130 g) (4.5 ounces) Coconut (Shredded, sweetened or unsweetened)
- ½ cup (115 g) (4 ounces) Unsalted Butter
- 2 tablespoons and 2 teaspoons (40 mL) Heavy Cream
- 2 tablespoons (30 mL) Vanilla Custard Powder (Such as Bird’s. Vanilla pudding mix may be substituted.)
- 2 cups (254 g) (8.9 ounces) Icing Sugar
- 3 oz. Nutella
- 3 oz. softened salted butter
- 6. oz. powdered sugar
- 4 ounces (115 g) Semi-sweet chocolate (I used bittersweet)
- 2 tablespoons (28 g) (1 ounce) Unsalted Butter (I used salted)
- Directions:
- For bottom Layer: Melt butter, sugar and cocoa in top of a double boiler. Add egg and stir to cook and thicken. Remove from heat. Stir in crumbs, nuts and coconut. Press firmly into an ungreased 8 by 8 inch pan. (I used a 10x6 pan, so my bars were a little thicker)
- For Middle Layer: Cream butter, cream, custard powder, and icing sugar together well. Beat until light in colour. Spread over bottom layer. (Mix Nutella and Butter. Add powdered sugar and stir until thoroughly combined.)
- For Top Layer: Melt chocolate and butter over low heat. Cool. Once cool, pour over middle layer and chill.


I like the side-by-side comparison of the 2 kinds of graham crackers! I made the wheat version and found them pretty easy to work with, though it’s a wonder I baked any–the dough was too yummy. Glad you liked them, and Nutella Nanaimos sound amazing!
wow this looks like a lot of work, i commend you! They do look quite addictive!
I love the idea of the nutella filling!!! I must try that next time I make these-we are huge fans of it
Good on you for trying both versions of the graham crackers. Interesting to compare the two.
The Nutella Nanaimo bars sound and look wonderful!
Ooooooh! Nanaimo bars are on of the things I have missed since getting diagnosed w/Celiac. I’ll have to try out the GF version.
I’m not surprised that Bob’s did not turn out well. I’ve had horrible experiences w/ Bob’s GF mixes. Pamela’s or Whole Foods mixes are much better for lazy, cheap, I don’t wanna buy 14 kinds of flour GF baking.
yum! I love that you used nutella. Great job!
Nutella..How yummylicious!
Nanaimo bars never have enough chocolate for me so you’re version should be right up my alley. Although I will have to stick with regular cream cheese frosting. For me that is more a delivery method for the frosting.
I am absolutely loving your blog!
Where do you get your dutch cocoa from?
Wow, I love the idea with the nutella icing! I’ll definitely bookmark your post to make this recipe. I live in Germany where you get nutella everywhere, but it needed your post for me to learn that the recipe varies for different countries – soooo interesting!
Now, they look super delicious. Great job, and what perseverance to try two batches of crackers! Nutella….mmmmm:)
WOW, is that ever sticky dough. I thought mine was sticky, but yours really takes the cake, errrrr bar.
The nutella icing is a GREAT idea….mmmm, hazelnuts.
Hmm, my dough was much less sticky, but that could just be because of where I live. Anyways, your bars look absolutely delicious! I love the Nutella flavour and really loved seeing the two side by side =D.
Wonderful job on my challenge!
My gluten filled crackers weren’t very crisp either, but I figured it was no biggie since they just got ground up. I love the Nutella in these. Nice work!!
You lost me at the Nutella filling. Holy cow, that sounds amazing. I could not have those in my house. No way.
I’m a HUGE fan of Nanaimo bars. I’m actually Canadian and I even lived a short ferry ride from Nanaimo for many years . . . but the love affair started long before that. This is a neat variation that I will definitely have to try!
These bars look fantastic! Anything with Nutella and I am in! Great pictures too.
Wow. That is very impressive that you made both kinds of graham crackers. I made the regular flour ones and found it to be a bit tricky. Your bars sound delicious. Nutella is a great idea!
I had trouble with my gluten free crackers sticking as well. My second half I used LOTS of rice flour and they didn’t stick. They were the best! A different flavor from store bought GC’s but that’s not necessarily a bad thing. I love your nutella center…I bet that was fantastic!
mmmmmmm. yum.
Gorgeous! Love the idea of using nutella in the middle – yum! Thanks for the comparison of the two varieties of flour…really interesting to see them side by side!
You had me at Nutella. Awesome. I’d eat the whole pan. Seriously.
Beautiful! I love the Nutella twist ; )
Just made these – oh my goodness they are AWESOME. Somebody better stop me before I eat the whole pan!